SDK
We provide you with a NPM package for Node.js and Browser environments. Please see our GitHub page for details.
Getting started
This is a very short step by step guide to help you getting started and fetch a few transactions with our API and SDK in Node.js. You can do much more with it, please refer to the documentation or get in touch with us.
Requirements
Please have Node.js + NPM installed. This example is using plain JavaScript for simplicity, but you can use TypeScript as well.
Setup a new project
Create a new folder kontist-connect-example and open it in your terminal.
Init the project and add kontist as an dependency.
npm init -y
npm install kontist
Create a new file index.js
Create a new client
Add the following code to your index.js:
const { Client } = require("kontist");

const client = new Client({
    clientId: "<client id>",
    clientSecret: "<client secret>",
    scopes: ["transactions"]
});
You need to enter a <client id> and <client secret> here. Create your own client via the Client Management section.
Click “Create Client” and enter a name and a secret. You will need to check the “Transactions” scope for this example. Enter some url like “https://example.com/” into the “Redirect URI” as we do not use it in this example.
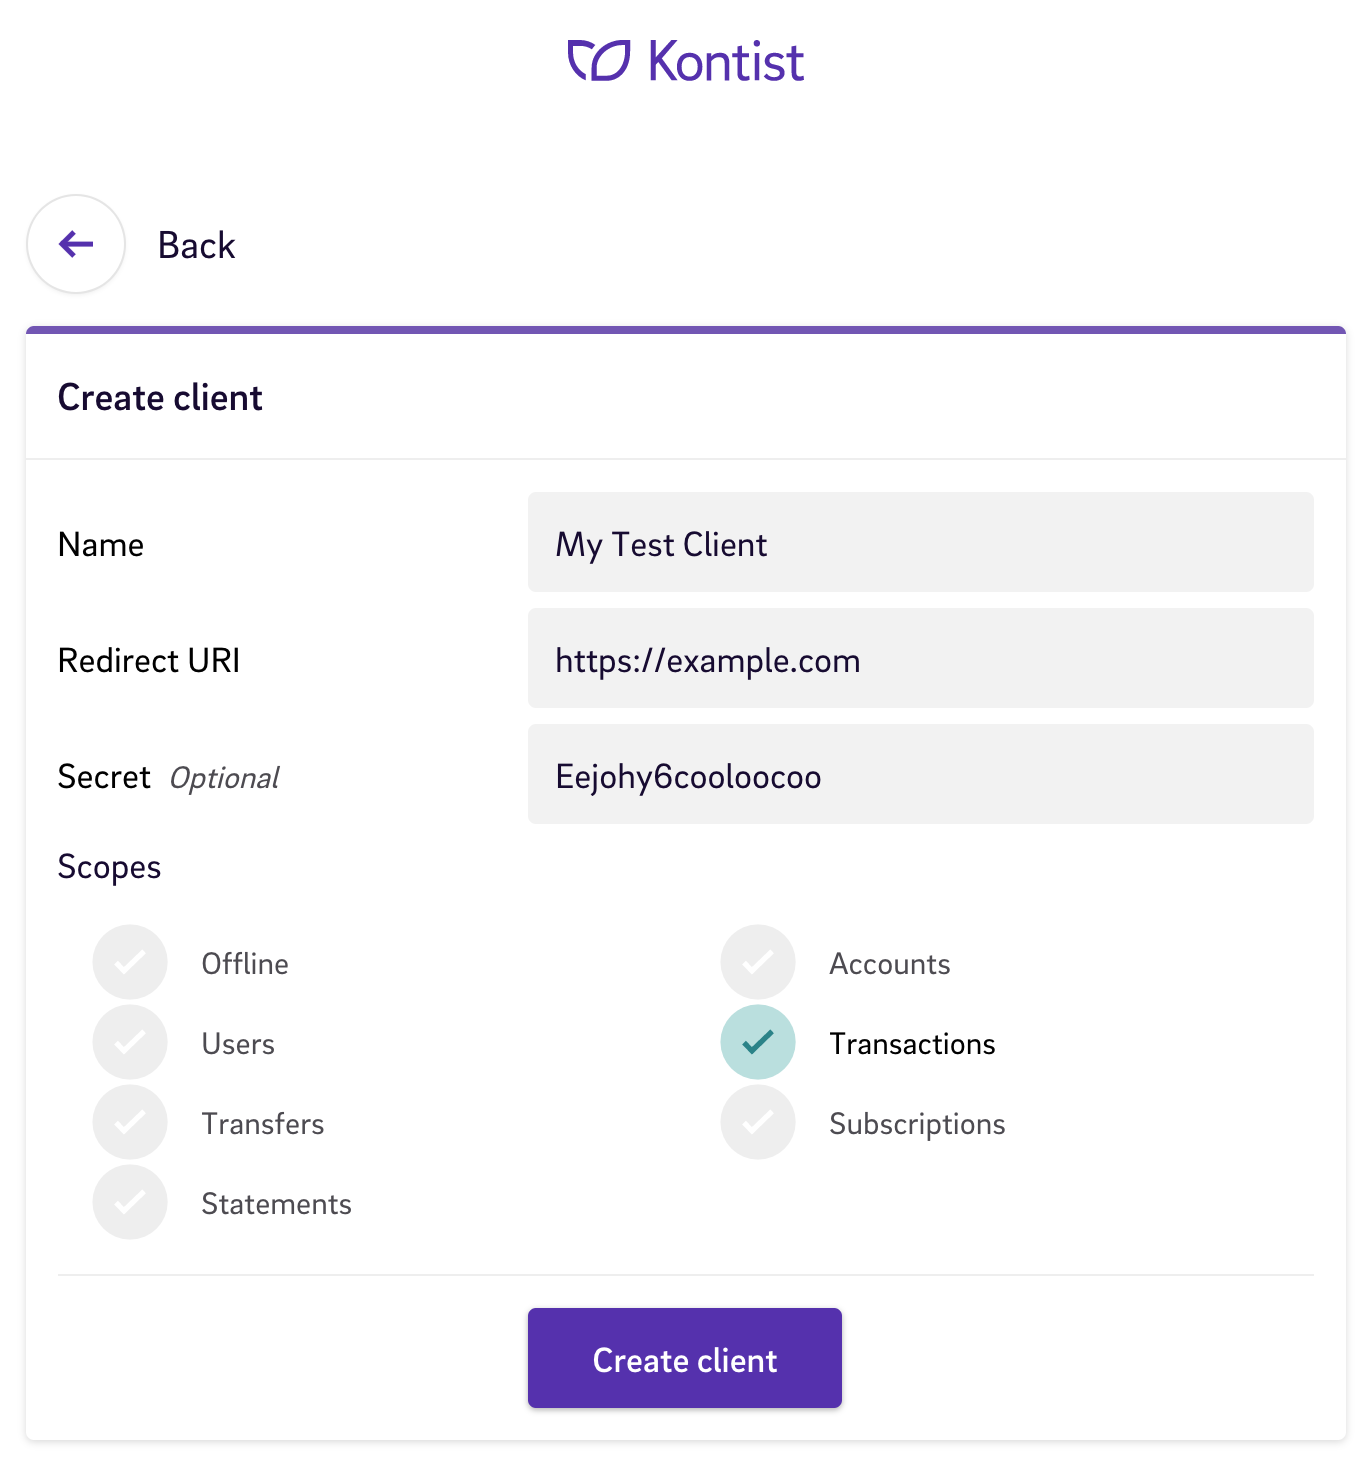
After you did create the client click on it in the overview in order to reveal its client id.
Login and fetch transactions
Note: In this example you only want to access our own account. You can do this by using your own client and your username and password with the fetchTokenFromCredentials method. If you want to create an application that other users can use as well, then please follow the authentication section in the documentation.
But for our own user this can be simplified by just using username and password like this:
const username = "<your username>";
const password = "<your password>";

client.auth.tokenManager.fetchTokenFromCredentials({ username, password })
    .then((tokenData) => {
        console.log("Your unconfirmed access token is:", tokenData.accessToken);
        console.log("Starting MFA...");
        return client.auth.push.getConfirmedToken();
    })
    .then((confirmed) => {
        console.log("Your confirmed access token is:", confirmed.accessToken);
        console.log("Fetching latest transactions...");
        return client.models.transaction.fetch();
    })
    .then((transactionData) => {
        console.dir(transactionData.items);
    })
    .catch((err) => console.error(err));
Save the index.js and run the script via
node index.js
You should see this output:
Your unconfirmed access token is: eyJhbGciOiJIUzI1NiIsInR5cCI6IkpXVCJ9.eyJzdWIiOiJ5eXkiLCJzY29wZSI6InRyYW5zYWN0aW9ucyIsImNsaWVudF9pZCI6Inh4eCIsImlhdCI6MTU3OTg4MDMxNCwiZXhwIjoxNTc5ODgzOTE0fQ.FBZZkGYSF1QCWhLXq7Y4oUDQ85AOx6qxT7wbf9BQ29k
Starting MFA...
Now you need to take your smartphone with the Kontist app and confirm the login. After that the confirmed access token is shown and then a few transactions are fetched.
Your confirmed access token is: eyJhbGciOiJIUzI1NiIsInR5cCI6IkpXVCJ9.eyJzdWIiOiJ5eXkiLCJzY29wZSI6InRyYW5zYWN0aW9ucyIsImNsaWVudF9pZCI6Inh4eCIsImNuZiI6eyJraWQiOiJ6enoifSwiaWF0IjoxNTc5ODgwMzQ3LCJleHAiOjE1Nzk4ODM5NDd9.dOavYfsqGpCu-wIUox8lQw_lo2yP8OA5QylQAKbeZn0
Fetching latest transactions...
[
  {
    id: 'a0c01510-d425-4193-8976-f6a3f82121e7',
    amount: 100,
    name: 'Test sender',
    iban: 'DE40220500009007705534',
    type: 'SEPA_CREDIT_TRANSFER',
    bookingDate: '2019-05-28T23:00:00.000Z',
    valutaDate: '2019-05-28T23:00:00.000Z',
    // ...
  },
  // ...
]
This was just a basic example. Please have a look at this documentation for more examples and things you can do with this SDK.
Installation
Node.js
Please install the SDK via npm install kontist. Depending on your application type you can then import it with
import { Client } from "kontist";
TypeScript users should add at least "lib": ["es2018.asynciterable", "es6", "dom"] to their tsconfig.json.
Browser
For your web application you can install the SDK via npm install kontist and then just load the bundle via
<script src="node_modules/kontist/dist/bundle.js"></script>
If you prefer you can skip the npm install and just use the latest version from our CDN with
<script src="https://cdn.kontist.com/sdk.min.js"></script>
Authentication
Node.js
If you are developing an application where you can store a clientSecret you can authenticate with regular OAuth2. In this example we will use express.
import express from "express";
import { Client } from "kontist";
const app = express();
We need to provide the values for our app from the Client Management and set the state to a random number. If you did not open an account with Kontist yet you should do so now.
const client = new Client({
  clientId: "<your client id>",
  clientSecret: "<your client secret>",
  redirectUri: "<your app url>/auth/callback",
  scopes: ["transactions", "transfers"],
  state: (Math.random() + "").substring(2)
});
If the user goes to “/auth” we will redirect him to the Kontist login.
app.get("/auth", async (req, res) => {
  const uri = await client.auth.tokenManager.getAuthUri();
  res.redirect(uri);
});
After the user authorized the app he will be redirect back to the redirectUri which we set to the /auth/callback endpoint.
app.get("/auth/callback", async (req, res) => {
  const callbackUrl = req.originalUrl;

  try {
    const token = await client.auth.tokenManager.fetchToken(callbackUrl);
    /* got access token, login successful */
    res.send("Successful, your token is " + token.accessToken);
  } catch (e) {
    /* handle error */
    res.send("Failed: " + JSON.stringify(e));
  }
});
The last thing left is to start listening on connections.
app.listen(3000, function() {
  console.log("Listening on port 3000!");
});
If you now visit http://localhost:3000/auth you will be directed to the Kontist login and then back to your application. The token will then be printed in the console and you can start using the client.
Browser
In some environments we cannot store a client secret without exposing it (e.g. a web application without a backend). To authorize the client we will use OAuth2 with the PKCE extension. During initialization of the client you just need to provide a verifier and persist it across page reloads. You also need to provide your clientId, a state and redirectUri. You can set all of this up in the Client Management. If did not open an account with Kontist yet you should do so now.
// persist two random values
sessionStorage.setItem(
  "state",
  sessionStorage.getItem("state") || (Math.random() + "").substring(2)
);
sessionStorage.setItem(
  "verifier",
  sessionStorage.getItem("verifier") || (Math.random() + "").substring(2)
);

// initialize Kontist client
const client = new Kontist.Client({
  clientId: "<your client id>",
  redirectUri: "<your url of the app>",
  scopes: ["transactions", "transfers"],
  state: sessionStorage.getItem("state"),
  verifier: sessionStorage.getItem("verifier")
});
If the user opens the page the first time we need to redirect him to the API so that he or she can authorize your application.
const code = new URL(document.location).searchParams.get("code");
if (!code) {
  // "code" query parameter missing, let's redirect the user to the login
  client.auth.tokenManager.getAuthUri().then(function(url) {
    window.location = url;
  });
} else {
After the authorization of the app the user is redirected back to the app’s page (which must be available at redirectUri). There is a ?code=xxxxx query parameter attached to it. We can just put the whole url into the fetchToken method and it returns an access token.
  // we have a code, the client now can fetch a token
  client.auth.tokenManager.fetchToken(document.location.href).then(function(token) {
      console.log(token);
  });
}
After the successful call of fetchToken the client application is authorized and you can make requests to the API.
Using an existing token
If you already obtained an access token previously (either with a previous SDK authentication or with any other method like using Kontist’s REST API directly), you can configure your SDK client instance to use this token with this method:
const token = client.auth.tokenManager.setToken(accessToken);
All SDK requests will then be performed with this new access token.
Optionally, you can also provide a refresh token if you have one:
const token = client.auth.tokenManager.setToken(accessToken, refreshToken);
Renewing access tokens
After the initial authentication steps described above, renewing access tokens can be done using this simple method:
const token = await client.auth.tokenManager.refresh();
Optionally, this method accepts a number as an argument to specify after how many milliseconds the refresh request should timeout (default is 10000):
// abort after 20 seconds
const token = await client.auth.tokenManager.refresh(20000);
The method is the same for both Node.js and Browser environments (it uses refresh tokens or PKCE with response_mode=web_message respectively).
Multi-Factor Authentication
Accessing Kontist banking APIs require Multi-Factor Authentication (MFA).
MFA is available once you have installed the Kontist application and paired your device in it.
The following steps are necessary to complete the MFA procedure:
- initiate the procedure by creating a challenge (Kontist SDK exposes a method to do that)
- click the push notification you received on your phone, it will open the Kontist application
- login (if applicable) and confirm the MFA by clicking on the corresponding button
Kontist SDK exposes a method to initiate the push notification MFA flow after you successfully received the initial access token:
// fetch a regular access token
const token = await client.auth.tokenManager.fetchToken(callbackUrl);
try {
  // create a push notification challenge and wait for confirmation
  const confirmedToken = await client.auth.push.getConfirmedToken();
  // once it has been verified, your `client` instance will have a confirmed access token
  // the confirmed token is also returned in case you want to store it
} catch (err) {
  // if the challenge expires, a `ChallengeExpiredError` will be thrown
  // if the challenge is denied, a `ChallengeDeniedError` will be thrown
  console.log(err);
}
After obtaining a confirmed access token with this method, you will have access to all banking APIs.
If your OAuth2 client is using refresh tokens, you will also receive a confirmed refresh token when the push notification MFA flow completes successfully. When renewing your access token with such a refresh token, it will already be confirmed, allowing you to perform the MFA procedure only once for the lifetime of your refresh token:
// initiate the push notification MFA flow
const { refreshToken } = await client.auth.push.getConfirmedToken();

// the received refreshToken is confirmed, and your SDK instance will be configured to use it for upcoming access token renewal requests
console.log(refreshToken);

// renew your access token using the regular method
const { accessToken } = await client.auth.tokenManager.refresh();

// your access token will be confirmed without having to go through the MFA flow again
console.log(accessToken);
If you want to cancel a pending push notification confirmation, you can call the following method:
client.auth.push.cancelConfirmation();
The Promise returned by getConfirmedToken will then reject with a MFAConfirmationCanceledError.
Advanced Topics
Some clients might use device binding with certificates as MFA or make use of other OAuth2 grant types. This depends on the environment where this application will run. Please see our advanced topics on authentication.
Using the SDK
Fetch transactions
You can use the fetch method to fetch the last 50 transactions:
const result = await client.models.transaction.fetch();
result then has following structure:
{
  items: [
    {
      id: "08995f8f-1f87-42ab-80d2-6e73a3db40e8",
      amount: 4711,
      name: "Example",
      iban: null,
      type: "SEPA_CREDIT_TRANSFER",
      bookingDate: "1570399200000",
      valutaDate: "2019-10-06T22:00:00.000+00:00",
      originalAmount: null,
      foreignCurrency: null,
      e2eId: null,
      mandateNumber: null,
      paymentMethod: "bank_account",
      category: null,
      userSelectedBookingDate: null,
      purpose: "kauf+dir+was",
      bookingType: "SEPA_CREDIT_TRANSFER",
      documentNumber: null,
      documentPreviewUrl: null,
      documentDownloadUrl: null,
      documentType: null
    }
    // ...
  ];
}
If there are more than 50 transactions, result will also contain a nextPage method. When called, nextPage will return another result object.
Another way would be to just iterate over client.models.transaction.fetchAll(). It implements the AsyncIterator interface, so you can do this to fetch all transactions:
let transactions = [];
for await (const transaction of client.models.transaction.fetchAll()) {
  transactions = transactions.concat(transaction);
}
Transactions search
If you want to provide search functionality for your users’ transactions, you can use:
const result = await client.models.transaction.search(userInput);
result will have the same structure as the fetch method, returning only the transactions that match the user’s input (up to 50 maximum):
{
  items: [
    {
      id: "08995f8f-1f87-42ab-80d2-6e73a3db40e8",
      amount: 4711,
      ...
    }
    // ...
  ];
}
Filtering will be done by looking at each word in the user’s input, and look for matches for name (sender/receiver), iban, purpose (reference) and amount (when applicable) fields, and return only matching transactions.
For example:
const result = await client.models.transaction.search("DE123456 Paypal 42");
Will return all transactions which have iban containing “DE123456”, or name containing “Paypal”, or purpose containing “Paypal”, or amount equal to 42€, or amount equal to -42€.
Note: Under the hood, it just uses the filter argument of the fetch method with a predefined set of generic filters covering the most common use case.
Categorize a transaction
Transactions can be categorized using:
const result = await client.models.transaction.categorize({
	id: "08995f8f-1f87-42ab-80d2-6e73a3db40e8",
  category: TransactionCategory.TaxPayment,
  userSelectedBookingDate: "2019-10-06"
});
Note: Only transactions of types TaxPayment, VatPayment , TaxRefund, VatRefund can have a userSelectedBookingDate, if you provide an invalid combination, your categorization request will be rejected.
Subscribe to new transactions
A ‘Subscribtion’ is a GraphQL concept allowing clients to listen to new events published by a GraphQL server.
The SDK allows you to subscribe to new transactions using the subscribe method:
const onNext = transaction => {
  // do something with the transaction
};

const onError = error => {
  // do something with the error
};

client.models.transaction.subscribe(onNext, onError);
Whenever a new transaction is created, the onNext function will be called.
Whenever an error occurs with the subscription, the onError function will be called.
The subscribe method returns a Subscription object with an unsubscribe method to be called when you want to unsubscribe to new transactions:
const { unsubscribe } = client.models.transaction.subscribe(onNext, onError);
// ...
unsubscribe();
// after this point, onNext / onError will no longer be called when new transactions / errors are received
Fetch transfers
You can use the fetch method to fetch the last 50 transfers of a given type:
const result = await client.models.transfer.fetch({
  type: "SEPA_TRANSFER"
});
Specifying the type of transfer is mandatory, existing types are: SEPA_TRANSFER, STANDING_ORDER and TIMED_ORDER.
If you are using typescript you should use the corresponding Schema.TransferType enum:
import { Schema } from "kontist";

const result = await client.models.transfer.fetch({
  type: Schema.TransferType.SepaTransfer
});
Optionally, you can also specify a filter using the where field.
For example, if you only want to get “scheduled” timed orders:
const result = await client.models.transfer.fetch({
  type: "TIMED_ORDER",
  where: {
    status: "SCHEDULED"
  }
});
And using typescript:
import { Schema } from "kontist";

const result = await client.models.transfer.fetch({
  type: Schema.TransferType.TimedOrder,
  where: {
    status: Schema.TransferStatus.Scheduled
  }
});
result then has following structure:
{
  items: [
    {
      amount: 4231,
      e2eId: "E-0f4c88099b7e6b62e002f302ed490dbc",
      executeAt: null,
      iban: "DE18512308000000060339",
      id: "f4ff3af1d198e222bf5f2be5301827aa",
      lastExecutionDate: null,
      nextOccurrence: null,
      purpose: "Transfer purpose",
      recipient: "Example",
      reoccurrence: null,
      status: "CONFIRMED"
    }
    // ...
  ];
}
If there are more than 50 transfers, result will also contain a nextPage method. When called, nextPage will return another result object.
Another way would be to just iterate over client.models.transfer.fetchAll(). It implements the AsyncIterator interface, so you can do this to fetch all transfers of a given type:
let transfers = [];
for await (const transfer of client.models.transfer.fetchAll({
  type: Schema.TransferType.StandingOrder
})) {
  transfers = transfers.concat(transfer);
}
Create a new transfer
To create and confirm a transfer:
const confirmationId = await client.models.transfer.createOne({
  amount: 1234,
  recipient: "<recipent_name>",
  iban: "<recipent_iban>",
  purpose: "<optional_description>",
  e2eId: "<optional_e2eId>",
});

// wait for sms
const smsToken = "...";

const result = await client.models.transfer.confirmOne(
  confirmationId,
  smsToken
);
Create multiple transfers
To create and confirm multiple transfers (with only one confirmation):
const confirmationId = await client.models.transfer.createMany([{
  amount: 1234,
  recipient: "<recipent_name>",
  iban: "<recipent_iban>",
  purpose: "<optional_description>",
  e2eId: "<optional_e2eId>",
}, {
  amount: 4567,
  recipient: "<recipent_name>",
  iban: "<recipent_iban>",
  purpose: "<optional_description>",
  e2eId: "<optional_e2eId>",
}]);

// wait for sms
const smsToken = "...";

const result = await client.models.transfer.confirmMany(
  confirmationId,
  smsToken
);
Create a standing order
See “Create a new transfer”, but please include these additional fields:
executeAt: "<execution_date>" // e.g. 2017-03-30T12:56:54+00:00
lastExecutionDate: "<optional_date>" // optional, e.g. 2019-05-28T12:56:54+00:00
reoccurrence: "<StandingOrderReoccurenceType>" // e.g. StandingOrderReoccurenceType.Monthly
For reoccurrence please see StandingOrderReoccurenceType enum: Monthly, Quarterly, EverySixMonths, Annually
Please note that you can only create one (not many) standing orders at the same time.
Create a timed order
See “Create a new transfer”, but please include this additional field:
executeAt: "<execution_date>" // e.g. 2017-03-30T12:56:54+00:00
Please note that you can only create one (not many) timed orders at the same time.
Cancel transfer
To cancel and confirm transfer cancellation:
let canceledTransfer;
const cancelResult = await client.models.transfer.cancelTransfer(
  TransferType.STANDING_ORDER,
  "<standing_order_id>"
);

if (!cancelResult.confirmationId) {
  canceledTransfer = cancelResult;
} else {
  // wait for sms
  const smsToken = "...";

  canceledTransfer = await client.models.transfer.confirmCancelTransfer(
    TransferType.STANDING_ORDER,
    confirmationId,
    smsToken
  );
}
Updating a Standing Order
You can change several attributes of an existing standing order by using:
const suggestions = await client.models.transfer.update({
  amount: 4231,
  type: TransferType.STANDING_ORDER,
  e2eId: "E-0f4c88099b7e6b62e002f302ed490dbc",
  id: "f4ff3af1d198e222bf5f2be5301827aa",
  lastExecutionDate: null,
  purpose: "Updated transfer purpose",
  reoccurrence: StandingOrderReoccurenceType.Monthly,
});
Notes:
- Currently, only standing order can be updated, so you must specify that
type. - While updating a standing order, any property that you do not specify will be set to
nullif applicable. This is why theamountproperty is mandatory.
Getting Transfer Suggestions
It can be useful to present users with IBAN and name suggestions (based on previous transactions and transfer data) when they create a new transfers. For this, you can use:
const suggestions = await client.models.transfer.suggestions();
suggestions will be an array of IBAN / Name suggestions:
[
  {
    name: "Example Suggestion 1",
    iban: "DE18512428000000060367"
  },
  {
    name: "Example Suggestion 2",
    iban: "DE58112428000000060367"
  }
]
Plain GraphQL requests
You can use the rawQuery method to send plain requests to the GraphQL endpoint like this:
const query = `{
  viewer {
    mainAccount {
      iban
      balance
    }
  }
}`;

const result = await client.graphQL.rawQuery(query);
GraphQL error handling
If one of your requests raises an error, an instance of GraphQLError will be thrown with the following properties:
| Property | Type | Description |
|---|---|---|
| name | name | The name of the error, i.e. GraphQLError |
| message | string | A message describing the error. |
| status | number | The HTTP status code of the error. |
| type | string | The type of the error as defined by the Kontist API. |
You can simply catch the error and execute some logic based on any of the above properties:
try {
  const confirmationId = await client.models.transfer.createOne({
    amount: 1234,
    recipient: "<recipent_name>",
    iban: "<recipent_iban>",
    purpose: "<optional_description>",
    e2eId: "<optional_e2eId>",
  });
} catch (error) {
  // Do something with the error:
  // GraphQLError {
  //   name: "GraphQLError",
  //   message: "There were insufficient funds to complete this action",
  //   status: 400,
  //   type: "https://api.kontist.com/problems/transfer/insufficient-funds"
  // }
}
Note: As per the GraphQL specification, the actual HTTP status code of the response will be either 200 or 500. Do not rely on that and rather use the status property of the error you caught.